Tuesday, September 16, 2014

Mixed Media Canvas with GDT Samara!


WOW…this piece is seriously one of my favorites.  I played with a lot
of images before I settled on all these components coming together.
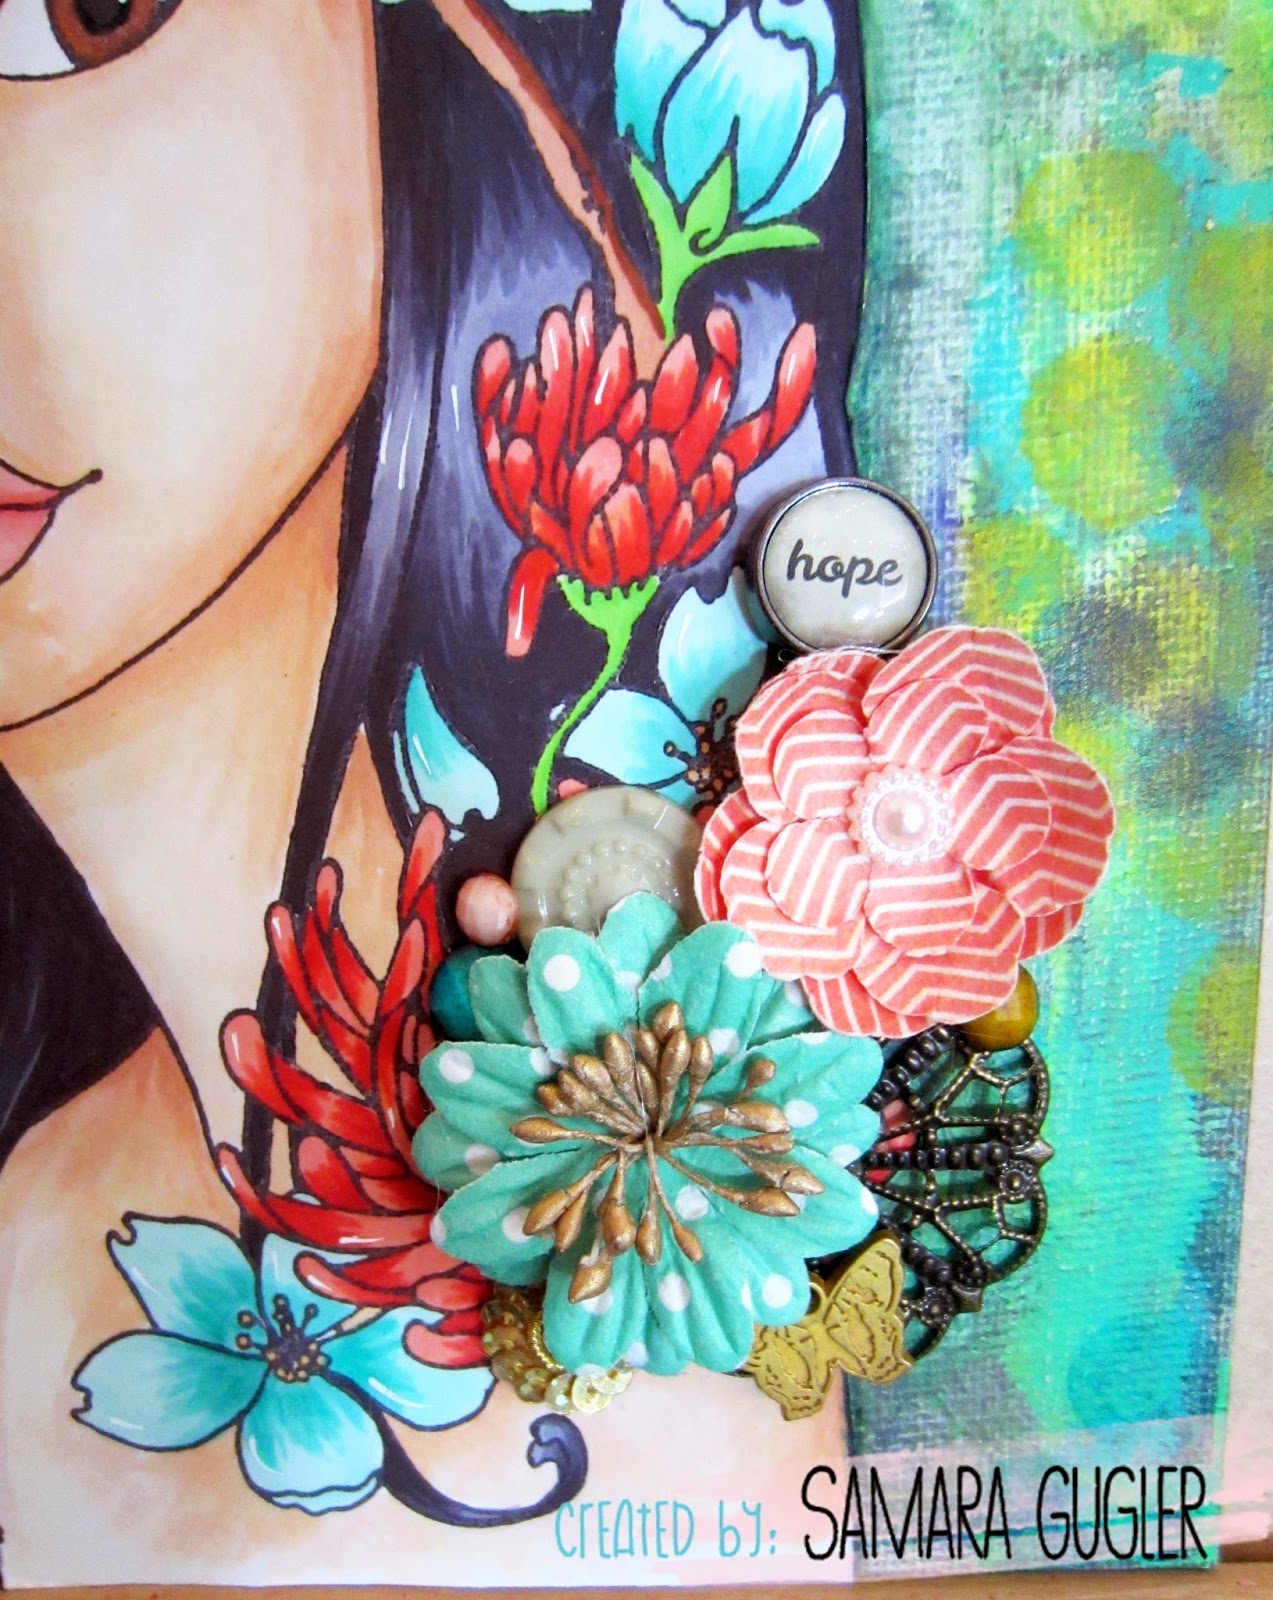
First, I selected the Jing stamp and colored her on Copic X-Press It
card stock using a variety of Copic Markers.  I added LuminArte
Twinkling H20s in Guatemalan Green, and Apricot Nectar to the flowers
in Jing’s hair.  I then very carefully cut her out.  I used a black
copic marker to carefully outline the sides so that the white cut line
wasn’t visible.  I set her aside while I prepared the canvas panel.


For the canvas panel, I used a variety of Liquitex and Golden acrylic
paints in coordinating colors.    I then used Dylusions sprays again
in coordinating colors.  Finally I used Gelatos by Faber Castell.  I
was able to create texture by using the foam dot brush in water to
remove the Dylusions and to add Gelatos.    I used Matte Medium to
carefully add Jing to the canvas paying close attention to not allow
the Matte Medium onto the front.  I added the canvas letters from
Prima (love) after carefully adding Dylusions inks.    I hand lettered
“Real” onto Copic EX-Press it and carefully cut out.  I adhered “love”
and “real” to the canvas panel and then hand lettered the remaining
phrase directly to the canvas using a Faber Castell PITT pen.

Now it was time to add the flowers.  I opened up all my flower
packages and went to town carefully layering.    Because I don’t
initially glue the embellishments down, I usually photograph my final
arrangement, remove them from the canvas and then using the photo
carefully build the piece back up.    I absolutely adore this piece
and have plans on framing her in a 3D frame (so that then flowers
don’t get smashes) and displaying her in my living room.


Enjoy!


Monday, September 15, 2014

Bloom Girl Fall Banner

Hi everyone.  It is me Jeannie with a fun banner for Fall, which can not get here soon enough, if you ask me!
Today I am using the Karlie stamp.  What I did this time was to use one image that I colored...
...and then I scanned it and printed it multiple times on kraft paper.  So I had a sheet or paper that looked something like this.

After that I started creating the banner.  


I wanted Karlie to be visible here and there so I cut the banner pieces to accommodate this.


I used some gorgeous Prima Marketing flowers to embellish the banner..


I also added some Prima Marketing Vintage Trinkets here and there.


Bloom Brads and Sugar Dots were also perfect for finishing this banner off just right.


Here is it on my front door, ready to welcome Fall.


Now if these 100+ temperatures would just go away!

I hope you have enjoyed my post today.  This banner was super easy to make and I love how whimsical and colorful it looks on my front door.


Friday, September 12, 2014

Scrapbooking Inspiration from DT Janine!

Hi it's Janine Koczwara here with my first Bloom Girl post.  I adore working with the Bloom Girl stamps, but I wanted to try and incorporate one onto a layout.

I have stamped "Gardenia" onto the amazing Bloom Watercolor paper, then proceeded to color with Faber Castell Gelatos and Watercolor Pencils.  To color with Gelatos, I rubbed some onto a silicone mat and then added water to make a lovely watery paint, allowing  me to paint her very easily and the colors blended well.  I then used flowers from the "Gardenia" stencil with Ranger Distress Ink, around the image before fussy cutting out to use on the layout.

Once I had my "Gardenia Girl" page accent all complete I went to town with other Prima Stencils and mixed media supplies to create this fun page around my daughter.


PRODUCTS USED:
980207 Prima Bloom Stamp - Gardenia
980252 Prima Bloom Stencil - Gardenia
980269 Prima Bloom Watercolor Pad
846824 Prima Epiphany Collection - Striking Appearance
846862 Prima Epiphany Collection - Words to Live By
846817 Prima Forever Green Collection - Garden Talk
572846 Prima Metal Dies - Flowers 2
577773 Prima Rodanthe Flowers - Whitecap
575922 Prima 6x6 Stencil - Decor 2
573744 Prima Bloom Spray - Iris
573935 Prima Bloom Spray - Tangerine
573805 Prima Bloom Spray - Gold Foil
Ranger Distress Ink - Mustard Seed
Ranger Distress Ink - Black Soot
Ranger Distress Ink - Dusty Concord
Ranger Distress Ink -  Ripe Persimon
Prisma Watercolor Pencil - Burnt Umber
Faber Castell Gelatos Boxed Set
White Sharpie Paint Pen
Black Cardstock


Wednesday, September 10, 2014

Some Gardenia Bloom Girl creativity with DT member Louise :) :) :)

Hello Hello fellow Bloom Girl Fans :)

Today I would like to share with you a layout that I created using the fabulous new release Bloom Girl Stamp - Gardenia

To create a simple background pattern to compliment my black and white photo I have quite simply heat embossed the stamped image. To add a highlight with a difference I have swiped/brushed a band of purple Color Bloom spray mist across the face of the stamped image. I have colour coordinated the resin frame with the same spray mist.

To draw the eye to the framed photo I have adhered/clustered  some gorgeous black glass beads, sequins and resin flowers around the frame, along the sweeping line of the Bloom Girls  flowing hair. Tendrils of black cotton thread extend out from this clustering of embellishments and are made to look like an extension of the Bloom Girls hair.


Technique Tip: to adhere the glass beads I have applied Glossy Accents in and around the resin frame, sprinkled on the glass beads, allowed it to partially dry, and then gently shaken off the excess beads not adhered.


As you can see from these two close up photos I have higlighted the pattern of the resin frame. I have done with with a black ink pad.

So Bloom Girl Fans that is it from me for the moment, I do hope you are enjoying the Creative Design Teams creativity this month as much as I am :) :) :)

Cheers and Happy Creating!

Louise :) xxx


Monday, September 8, 2014

Joy In Fall - Card by DT Lisa

Hi everyone! Happy Monday. :) It's Lisa here with on the blog and I have a card to share with you. So here's the card and then let me tell you a little bit about it:


I decided to use the September Challenge inspiration colors for my card. They're wonderful warm colors and really very versatile. I used Jamie's Joy Bloom Girl stamp for my main focal image and I stamped her using an embossing ink, then heat set it using a metallic copper embossing powder.

All of my coloring is done using PanPastels. Yep, ALL of it. I'm taking Jamie's PanPastel Online Workshop and it's amazing! I'm learning so much already, but I feel like I want to learn everything. Ha!!  Here's a close-up of her:


The stamp is just gorgeous and those PanPastels really make her come to life. I'm probably biased here. ;) All of the beautiful flowers and leaves are from Prima's Free Spirit - Flower Power and I added a few random sequins for interest along with a metal embellishment (Finnabair Mechanicals - Vintage Trinkets - Leaves 1) .

Thanks for stopping by the blog today and don't forget to stop by the Facebook page and play along in our challenges which you can always find off to the right.

Have a wonderful week!

Friday, September 5, 2014

Bloom Girl Karlie card by DT Stephanie!

Hi everyone! 

Stephanie here on the blog today for a little back-to-school touch with Bloom Girl Karlie. I love that she has brushes and all kinds of things in her hair, with a sharp look saying "I've got a creative mind!". She can be pretty much any style you want, that's why she fits perfectly for a back-to-school themed card. I also used some papers from the School Memories collection, black chalkboard flowers, purple die and Mechanicals elements from Prima Marketing.


Thanks for visiting us today, and don't forget to check in on our Facebook group to see sneaks and many other fun things about the Bloom girls <3

Wednesday, September 3, 2014

A Card for the New School Year's Teacher

 It's that time of year again.  Back to school, new beginnings and NEW TEACHERS!!
I made this card for my 2nd grader to give to her new teacher.
I used Bloom Girl Sophie on this card, because she looks a little like my daughter's new teacher.


I used so many different things to color this in, but the main coloring was done with Inktense colored pencils.


This is a Tri-Fold card, so when you open the first flap, you will see the Teachers name...


Then the inside has a piece of lined paper that I'm going to let my daughter write a note or draw a picture, what ever it is she wants to do. :)


Here is one last look, I secured it closed with a Bloom Girl Typewriter Key Paper Clip.  The card has also been embellished with Bloom flowers and the Optimist 6 x 6 paper pad.


I hope you have enjoyed my post today. 
This has been Jeannie from The Polka Cabana with Today's post.