Wednesday, October 29, 2014

Just Breathe Tag with DT Lisa

Hi Bloomies! ;) It's Lisa with you today and I decided to spread my wings a little and do something I hardly ever, ever, EVERRRRR do: play with Copics. In fact, not too long ago I sold almost all of mine. I have about 25 or so left. So, this will be far from perfect, but I did have fun and I got a LOT of help from my Design Team mate Mindy (thanks sweets!).


I really wanted to NOT make a canvas or a card, so that's why I chose to make a tag. And tags are so fun to make. They can be so many sizes! This one is large at 4 1/8 x 8 1/2 and very 3-dimensional. It can be given as a gift on it's own or hung ON a gift. I just love tags. When was the last time YOU made a tag?

Here are some close-ups of my pretty Bloom Girl Sharon Tag:


I don't pretend to be an expert at Copics. I'm not. But, I sure had fun playing with them and I may break them out again. Who knows? And those of you who know how to use them and use them well? Have my FULL respect. They are not easy to master. Or even play with...ha! But I do hope you enjoyed my tag anyway.

Wishing you all a wonderful Wednesday. :)


Monday, October 27, 2014

Light Up Your Day Bloom Girl Style with Sherry Bienert

Hey everyone! It's my turn again to bring a little Bloom goodness to the blog!! I decided to challenge myself a bit for this project!!! So while I was at IKEA with my fiancĂ©, I took him over to the 'as is' section and said 'pick something.....' Five minutes later, with a smile on his face he hands me a tattered, stained, grey lampshade!!! I asked if there was a clean one, but with a grin he tells me no because this is the one he picked... And it's only 99 cents! I embraced the challenge and decided to showcase how easily anyone can transform an everyday object with things that are already in their stash!! Other then the lamp shade everything came from my stash already in the craft room!!


Let the transformation begin!!!! First I masked off randomly spaced, different width stripes vertically around the whole shade with painters tape, then painted between the lines with white acrylic paint. Before the paint dried I pulled the tape off then let dry completely. Using versamark and black embossing powder i embossed 'Summer' from the Bloom Girls cling stamps into place on the lamp shade.  Next I used Prima matte gel medium and collaged torn strips of old book paper, music sheet and drywall tape. Once the gel medium was dry I used a polka dots stencil And applied molding paste randomly around Summer and the paper strips! Let dry!


Taking an assorted selection of ink distressed Prima flowers and mechanicals, Bloom Girl brads, burlap and pearls I arranged them diagonally on either side of Summer. Using the Butterflies from the Sharon stencil and some black molding paste on a transparency sheet, I created beautiful 3d butterflies to add more dimension. I inserted my photo into a photo frame and selected a definition sticker and adhered with pop dots. To finish the shade off I added a few pops of color to Summer with acrylic paint and added a few splatters of white paint to tie everything together!!


And now I have a fabulous, customized lamp shade for my creative room!


Beautifulmess5891.wordpress.com

Sherry

BeYOUtiful Bloom Canvas

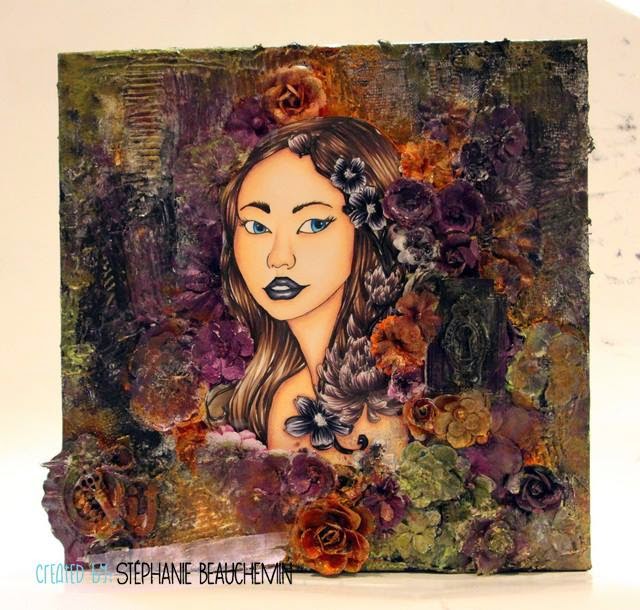
Hi everyone, it's Janine Koczwara here with another Bloom Girl blog post.  I absolutely adore how perfect the size of Jamie's Bloom Girl Stamps are for canvases!  It makes creating a striking piece of art so easy.

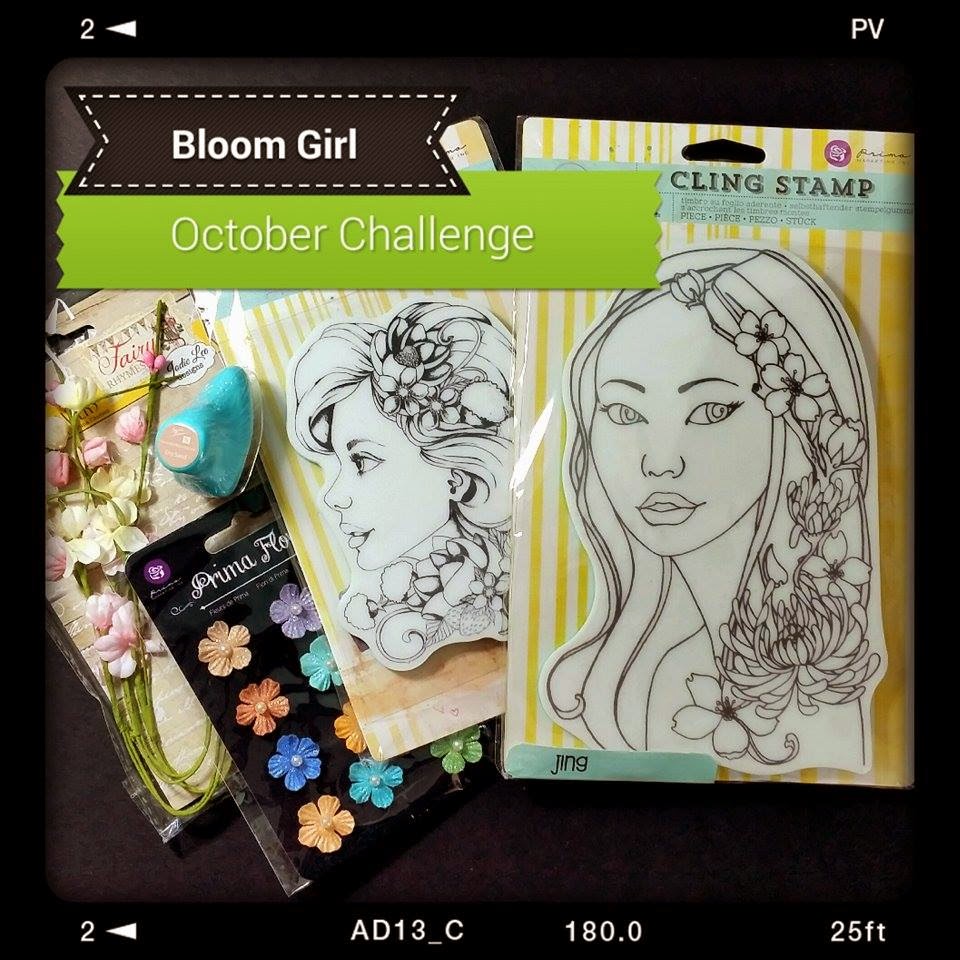
The other wonderful part about these stamps is that you don't necessarily have to sit down and do it all at once.  I stamped the Prima Bloom Stamp Sharon onto Copic Blending Card before I had to take a 4 hour plane journey and then packed a few Copics and Prisma pencils in a pencil case and took on the plane.  While I flew across the sky, I amused myself by colouring this girl.  I might add the flight attendants found it fascinating! They kept coming back to just see what progress I made. LOL!  She then sat at home with a couple of other images I have coloured, waiting for the perfect opportunity to use.

Then I created the background for her.  I have a few "go to" things I often do when creating a canvas. First I added a few touches of colour with Faber Castell Gelatos.  I love the way you just messily colour a couple of areas before you use a brush to blend it in. It blends so beautifully and gives an awesome base to work from once dry. (See that pink craft mat in the background, every time I use it I think of the gorgeous lady called Gina who gave it to me after attending a couple of my classes in the US)


I then went on to add some napkins, tissue paper and some text paper with Matte Medium, for a little bit of texture and dimension in the background.  Folowed by some acrylic paint here and there and some white circles applied with my finger.  Then more of these 3 gelato colours onto the circles I had put on there, smushing in with my finger and adding dimension through Faber Castell Big Brush Markers on the underside to intensify the colour.

Finally I added a stencil with Modelling Paste and again used Matte Medium to adhere my Bloom Girl to the canvas.  I made sure some of the Matte Medium went outside her hairline and then sprinkled glitter over it, for a sparkly halo effect.


I finished off the canvas with a die cut title and a smattering of Prima Flowers in teal, yellow and orange, to compliment the tones in the coloured Bloom girl image.  Making canvases from these Bloom Girl Stamps is just so much fun I really do recommend you try one, as they will make an awesome gift this Christmas.


PRODUCTS USED:
6 x 12 inch Canvas
Prima Bloom Stamp Sharon
Prima Soft Matte Gel Medium
Prima Modelling Paste
Prima Heavy Gesso
Prima Gold Glitter
Prima Background Stamps
Tim Holtz Tissue Paper
Copics, YR0000, YR000, YR00, E000, R20, BV000
Prisma Coloured Pencils
White Sharpie Paint Pen
Black Sharpie
Paper Napkin
Prima Flowers
Faber Castell Gelatos
Faber Castell Big Brush Markers
Ceramcoat Acrylic Paint
Luminarte Silk Solar Gold
Lumninarte Polished Pigemnts Gold Dust
Kaisercraft Die - BeYoutiful
Ranger Archival Ink
Dr Ph Martin India Inks
Artist Cellar Stencil


Wednesday, October 22, 2014

Altered Bloom Book Box by Mindy!

 Hey crafty peeps!

It's Mindy here. I have an altered book box to share with you.
I have used my Bloom Girl Sharon Stamp. Which I just LOVE! I colored her in using my Copic. The flowers and papers are by Prima. This collection is so super cute, it's called Coffee Break.

Tomorrow I'll be heading out to Puerto Rico and this is actually one of the projects we are making this Saturday at Scrapbooking Gallery PR.


Don't forget we have our Challenge for this month. If you'd like to win this amazing goodie package from Jamie Dougherty play along and use your favorite Bloom Girl to enter!
 
Have a great week everyone!
 
Hugs, Mindy

Tuesday, October 21, 2014

DIY Watercolor Journal With Bloom Girls Instachick


Pump up a plain journal with a BloomGirls stamp and some basic children's watercolors. Buy a bunch of plain journals and paint them differently to give as gifts to your friends. You can even do this on binders and envelopes! 

I decided to go for a rainbow brite type of look on this Bloom Girl. That's what I really love about these stamps - you can use them to make a portrait of someone you know in real life or you can go totally imaginary with them! Check out how I made this afforable project in under 10 minutes:
Supplies:

  • Bloom Girls Stamp - Instachick
  • Bloom Girls Paperclips - Instachick
  • Prima Alphabet Stickers
  • Blank Notebook
  • Child Watercolor Set with Brush
  • Water
  • ColorBox Archival Dye Ink - Black
Thanks for stopping by :)

Visit my blog for more inspiration


Monday, October 20, 2014

Bloom Girl Gardenia card by DT Stephanie!

Hi everyone! 


Stephanie here on the blog today, again with a card that I especially love with one of the Bloom Girls!


I decided to use Gardenia and add a little doodle here and there to her, celebrating today's optimist vibe. Even if the stamp size can be a bit unusual for a 5.5" squared card, I wanted to keep her whole and the flowers are making her pop even more, don't you think? So our gal Gardenia got coloured with Copic markers, then fussy cut, all edges blackened, got pumped on 3D foam adhesives, along on the Optimist patterned papers and some pink flowers from Prima Marketing.


Thanks for visiting us today, and don't forget to check in on our Facebook group to see sneaks and many other fun things about the Bloom girls <3


Friday, October 17, 2014

Blog Hop Extravaganza with Westcott and The Bloom Girls!


We are SO excited to present you a STRONG and BLOOMING collaboration between the Bloom Girl line by Jamie Dougherty and Westcott! All the designers have been playing with amazing products from Westcott and we were thrilled to base our projects on the Breast Cancer Awareness campaign that is always held during October.

To celebrate this awesome opportunity, both Jamie and Westcott are doing giveaways* to one lucky winner. Nice, right?! To enter the giveaways, you must comment on each blog listed below and make sure to thank our dear Jamie on the Bloom Girls Creative group on Facebook and Westcott on their Facebook page. You can find their products HERE on the Prima website and HERE on the Westcott one.


*The Westcott giveaway is open to US residents only from Oct. 17th 2014 10am PT to Oct. 20th 2014 12am PT. The Bloom Girl giveaway is open worldwide from Oct. 17th 2014 10am PT to Oct. 20th 2014 12am PT.

Have a sneak at the Design team's beautiful projects, then hop around to see their finished projects. 


Jamie Dougherty
Janine Koczwara
Jeannie De Gruccio
Lisa Adametz
Louise Nelson
Mindy Baxter
Stéphanie Beauchemin


Happy Creating!!!


Bloom Stencils and Twinkling H20 Fun

Hi it's Janine Koczwara here with another Bloom Girl creation.  I love to try and use just parts of the Bloom girl stamps and stencils rather than in their entirety as it allows for extra creative freedom.  For these projects I have used the Gardenia stencil and the Sharon Stencil, but just for the face outline, then I let the hair just come together with a bit of water colour fun!

In the image below I have used the Prima Bloom Gardenia Stencil to give the outline of the face and then I have had so much fun adding watercolour paint for the hair.  I like to do this as a two part process, adding standard watercolour paint first and then I like to go back in for extra dimension and highlights and use a similar colour in ColorArte H20's to add shimmer and volume.

I also used the flowers from the Prima Bloom Free Spirit stamp, stamped onto watercolour paper and again coloured with H20's and fussy cut out before being added to the hair to capture the element of being wild and free in the wind.  For the face, I used a mix of Prisma Watercolour Pencils and Faber Castell Gelatos with touches of White Sharpie Paint pen for highlights and Black Sharpie for definition.


In the textural image you can see the detail in the colouring of the stamped images a lot easier as well as the added Prima Clear Glass Beads into her hair for some fun dimension.


Below is another page I have created using one of the Prima Bloom Girl Stencils for a face outline.  On this one I have used the Sharon stencil, but as there is a big butterfly across the eye, I traced half the face through the stencil, then flipped it over, lining up the main features before tracing out the other side.  Just a quick and easy way to get more out of your stencil!  Again I have used watercolour paint for the hair in the same process as the first image, flat watercolour followed by ColorArte Twinkling H20's and as a final layer a quick spritz of ColorArte Gold Dust over the hair which adds a real "ethereal" quality to the image.  Both of these projects were created on the Prima Bloom Watercolour Paper Pad, which stood up to the large amount of water applied to the paper in this process.


Products Used:
980269 Prima Bloom Pad
980252 Prima Bloom Stencil Gardenia
980238 Prima Bloom Stencil Sharon
980184 Prima Bloom Stamp Free Spirit
Prima ArtIngredients Glass Beads Clear
Prima ArtBasics Soft Matte Gel
Prisma Watercolour Pencils
Faber Castell Gelatos Set
Sharpie Paint Pen White
Black Sharpie
ColorArte Twinking H20's
Color Arte Polished Pigment Powders


Thursday, October 16, 2014

Golden Girl Sharon By DT Louise

Hello Hello fellow Bloom Girl Fans :) :) :)

Today I would like to share with my project featuring the fabulous Sharon Cling Stamp.

To create this project I have first mono printed 2 black cardstock backgrounds with the gold paint and heat embossed the Sharon Stamp image on them both, with thick black embossing enamel powder.

With one I cut out three of the butterfly's to use as dimensional embellishments on the other.

Completing the embellishment I have used some gold and silver sequins, some Stickles [on the butterfly's wings] and some adhesive crystals and metal branches.


Thank you for dropping by today, I do hope that you are enjoying the awesome inspiration by the team this month.

Cheers and Happy Bloom Girl Creating!!!


Monday, October 13, 2014

October Challenge with DT Lisa


Hi everyone! It's Lisa here with you today and I'm bringing you my take on the October Challenge. Have you played along yet? You have all month long to participate! Just grab your fave Bloom Girl and get going. Here's the inspiration photo (as a quick reference) :


Current Challenge

And here's my take on the challenge photo. I used the same Bloom Girl stamp (Jing) and the colors:


What I did was to stamp her on black paper and heat emboss in white. Then I colored her in using pastel pencils. I added some highlights on the flowers using Viva Decor Precious Metal Color in Lilac and Copper. Her hair was darkened using Wink of Stella in black. And her lips and her one (showing eye) were glossified (hahha!) using Glaze. Oh! I also changed the color of the one purple flower. It WAS white. ;) Sneaky, huh? I just used a PITT Artist Stamper's Big Brush Pen to do that. The metal embellishment was painted with lime green acrylic paint then dabbed with black acrylic paint on top. Fun card that's easy to recreate.


Easy right? I always love seeing what everyone else creates during these challenges. I hope that you enjoy what WE create too and can see how easy it can be. 

HAPPY MONDAY!


Wednesday, October 8, 2014

Mixed Media Layout with GDT Sherry!

Hey everyone, Sherry here:) I just wanted to share with you this little gem inspired by my nieces Princess Party birthday! 

With Frozen on the brain, I used a variety of cut outs from the Silhouette Cameo, distressed inks, flowers, mechanicals, a few Bloom Girls brads and tons of stencils and mediums, I created this fun, bubbly, layered layout!

I applied Gardenia with her stencil and a brown resist chalk edger! 

I sprayed my girl silhouette and half my flowers with Bloom sprays. I mixed gel medium with Lindy's Stamp Gang magicals to apply through a bubble stencil onto girl silhouette. 

Using extra papers/stickers from my stash I layered some under my main photo (after enhancing with Faber-Castell gelatos) 


Using a variety of stencils (snowflakes, 'princess', bubbles) and a variety of mediums (molding paste, gloss gel medium mixed with magicals, matte gel medium)
 

Adhere girl silhouette with pop dots to the center right of the layout blowing towards the top left corner. 

I enhanced my silhouette cut bubbles with crackle paste and distressed ink. I adhered photos (with the exception of the main photo) to show through random bubbles. Cut into 3-5 bubble sections. Adhere a few sets of bubble without the photos so they appear to be blown from the girl towards too left corner. Adhere main photo onto coordinating paper using pop dots then adhering it on the top left section. Arrange all other bubbles, including the ones with photos in them, around the main photo. 

Arrange flowers, mechanicals and brads to the bottom right to tie it all in!!! 

Monday, October 6, 2014

Bloom Girl Hope card by DT Stephanie!

Hi everyone! 

Stephanie here on the blog today for a card with Bloom Girl Hope. She inspires me vision, and the concept of being open-minded to all that happens to you.

I stamped her twice, first on Xpress blend sheet and then on a patterned sheet from the gorgeous Cartographer line at Prima. The blank silhouette on Xpress paper got coloured with Copics markers (E000-00-21-11-04, R20, BV20-23-25-29, V91-95-99). I decided to cut the hair out of the Cartographer girl, leaving an opening for the flowers, and I traced the edges with black marker, then glued it on the first silhouette.

I also used other papers from the Cartographer collectionCartographer flowers, Cartographer flair, Ingvild Bolme resin frame from Prima Marketing, Tim Holtz long fasteners metal brads, Distrezz-it-all tool from Zutter.


Thanks for visiting us today, and don't forget to check in on our Facebook group to see sneaks and many other fun things about the Bloom girls <3


Friday, October 3, 2014

Zombie Bloom Girl Gardenia.

 
Hi there crafty peeps It's Mindy here!
 
 Since we have a gorgeous color combo/inspiration board I thought I'd make a Halloween Card. I used the Gardenia Bloom Girl Stamp. I wanted to make her look like a vampire or zombie, so I colored her lightly in my skin tone colors E11, E00, E000 then I went back with W5, W3, W1 and W00 to give her that 'dead pasty look'. I love the way it turned out. I had some flowers on this, but I thought it took away from the image, Soooo this was a no flower card. Shocking, right!?
 
 Remember ..you don't have to use a Bloom Girl Stamp to enter.. and you could win a fabulous prize from Jamie Dougherty!
 
Hope you all have a wonderful weekend!


Wednesday, October 1, 2014

October Bloom Girls Challenge 3


Hello Bloom Girl Friends!
Wow, September sure came and went! Thank you all so much for your gorgeous entries in our September Challenge. It was a tough decision but our winner for the September challenge is ...
 
 
Here is the gorgeous bookmark she created.
 
 
Congratulations! Please email Jamie at bloomgirlct@gmail.com to claim your prize!
 
Now for October's Challenge!
We have a spooky color theme/inspiration photo for this month. Jamie Dougherty did a fabulous job with this. I just love Bloom Girl Jing.

 
Starting this month we ask you to use a Bloom Collection item in your project. If you are interested in getting some products you can see a list of retailers HERE. You have all month to participate!
Look at this gorgeous prize package you could win!
How could you resist not playing along!


This month Sherry Bienert so look out for her gorgeous creations throughout the month!
Now for some inspiration from our ever so talented Designers!

Sherry


We hope you will join us this month!
Have a great day!