Wednesday, December 17, 2014

Fancy Christmas Tags by DT Stephanie

Good morning Bloomies!

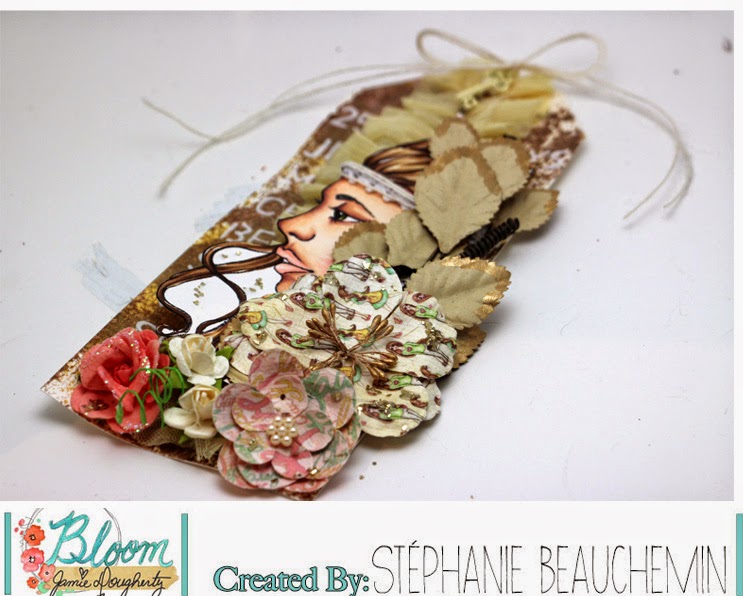
Stephanie here on the blog today with another Christmas inspiration for you, gift tags! You might remember my video on how to make a Bloom Girl tag earlier in November (warning - french speaking eheh!), where I was already starting the background of two more tags. Well, here they are today!

The first one was made with a watercolour paper tag absorbing all the ink from the Color Bloom sprays that was left on my teflon mat, then dried with a heat tool. I added some light paste through a stencil, letting it dry on its own this time to make sure it stays in shape. After that, I added a beautiful piece of Prima trimming in the middle, half-stamped Bloom Girl Free Spirit and coloured her with Copic markers. She was then put on 3D foam adhesive, got bloomed up with some gorgeous flowers and THAT'S IT! Quick and easy, right?!


The next tag was done with Bloom Girl Hope and approximately the same steps as the Free Spirit one, only this time when the light paste was fully dried, I added pinch of colour accents on it by dipping my brush into the Color Bloom spray bottles.


Thanks for visiting us today, and don't forget to check in on our Facebook group to see sneaks and many other fun things about the Bloom girls!

Monday, December 15, 2014

Summer Snow Queen Mixed Media Canvas

Hi Bloom Friends! It's Lisa with you this fine Monday and I am so thrilled to bring you my project today. I've had a color scheme in my head for quite a while and I've really been wanting to use it on the Summer Bloom Girl Stamp, which is a little ironic....seeing as it's Winter. :)


I knew Summer NEEDED to be a Snow Queen. She NEEDED to be dressed in elegant whites and golds. Her eye is a dazzling glass glitter. Her hair is touched with gorgeous Gold Leaf Mica Flakes. This canvas is texture, glittering golds, shimmering metallics and I wish I could hug it. (Yes, I'm crazy like that.)

There are a few steps involved but here we go!
1. Using a sticky back canvas, prime the canvas using Clear Gesso, so the colors of the watercolors don't alter. Allow to dry.

2. Adhere random pieces of white pieces of tissue paper on top of the sticky back canvas (just enough to cover an are where the stamp will go). Coat will Gel Medium. Go for texture! Allow to dry.

3. Stamp Summer using Distress Paints. These are a water based acrylic paint that are VERY water soluble. Spritz the bottom areas of her hair with water, if desired. Mix different areas prior to stamping for different tones to the paint. (I used Walnut Stain, Vintage Photo, Tarnished Brass, & Frayed Burlap.) Heat Set.

4. Once dry use watercolor pencils to create shading. I used TWO watercolor pencils for the shading and one for her pupil. That's it! Oh and this is when I did her iris with the glass glitter, too.

5.  After all the shading is done to your satisfaction is when you get to go crazy adding your flowers. This is entirely up to you. The size, the colors, the amount, etc. Since I was going for a white/gold theme that's what I did here.

6. Then start building your background. I used old packaging. I tore some cardboard off of a box then ripped the top layer of paper from it here and there and coated it with white gesso. I also added in some Mica Flakes in Frosted and a tiny sprinkling more of Glass Glitter in Gold Rush.

7. Using the Color Bloom Spray in Gold Foil and the 12 x 12" Bubbles Stencil I gave a 9 x 12" canvas a light coating with the spray. Just enough to have some of the pretty gold shine through. I highlighted some of the circles (or "bubbles") with a gold watercolor pencil and also with a Gold Pan Pastel for extra shine.

8. Prior to adhering everything together I wrapped some Prima Trim around the corrugated cardboard piece and then adhered that to the canvas. Then I attached a small strip of glitter trim to the bottom of the corrugated cardboard and across the trim. Finally, removing the backing and adhering the Snow Queen!

Here are some alternate views:


This photo shows her flowers a little bit better, I think.


It was a little hard for me to take the photos without them looking grey, White is just so hard to photograph!!  But, I just love how this turned out and I hope you'll make your own "Snow Queen" Bloom Girl.

Products Used:
Prima:
Prima Bloom Girl Stamp (Jamie Dougherty Designs):  Summer
Color Bloom Sprays:  Summer Sky, Vintage Metal – Gold Foil
Mica Flakes: Frosted, Gold Leaf
Prima Stencil: 12 x 12” Bubbles
Prima Flowers:
Prima Medley Treasure
Prima Jubilee Christmas Collection 
London Collection – Majesty
Interlude A
Frost Mini Sachet
Prima Trim
Art Basics Soft Matte Gel
Art Basics Gesso, Clear

Other:
Ranger Sticky Backed Canvas
Blick 9 x 12” Canvas Art Panel
Pan Pastel Gold
Ranger Distress Paints: Walnut Stain, Tarnished Brass, Frayed Burlap, Vintage Photo
White Tissue Paper
Faber –Castell Design Memory Craft® Art GRIP® Aquarelle Watercolor Pencils




Friday, December 12, 2014

Altered Mixed Media Bloom Girl Sharon Notebook


Hello crafty friends!
Mindy, here. I have an altered notebook to share with you. I will be completely honest. About 20 min into this project I was like ok, I'm done... this looks HORRIBLE! I almost turned off the camera. Then I was like you know what.. let's go with it.. I can always delete the video and start over.. I might as well try some new ideas and techniques. So I did and I'm so glad I did, too!
 
 
Here's my notebook I came up with.


I hope you enjoyed the photos.. I hope you will check out how I created this in my video below,


Products Used
Prima Marketing's Bloom Girl Sharon Stamp
Faber-Castell's Gesso, Water Color Pencils, Gelatos, whipped spackle and markers
Tim Holts Tissue Paper and Quote Stamp


Wednesday, December 10, 2014

Acrylic Painting with GDT Hee Sun Kim.

Hee Sun Kim here with my GDT first project for Jamie Dougherty Designs.
Today.  I would like to share "Bloom Girl Pop Art Canvas" tutorial with you. 
 
1. Gesso on a canvas.
 
 
2. Stamping using a Archival Ink.
 
 
3. Painted using acrylic paint.
 
 
4. Redraws the lines using a black marker.
 
 
5. Draw a highlight using a white marker.
 
 
6. Finish!
 
 
7. Here are some of the closer views.
 
* Materials: 
#980191 Prima - Bloom Collection - Cling Mounted Stamps - Jing Bloom 
#980252 Prima - Bloom Collection - 12 x 12 Stencils Mask Set - Gardenia 
#564506 Prima - Flower vine
#575182 Prima - Bloom Collection - Flower Embellishments - Sun Kissed
Ranger Ink - Archival Ink Jet Black
Ranger Ink - Dina Wakley Acrylic Paint
Sharpie Black & White Paint Marker

Monday, December 8, 2014

Winter Jing Tag - with DT Lisa

Hi Bloom Girls (and Guys lol) ! It's Lisa here with you today and I have a tag to share using the beautiful Jing Bloom Girl stamp. I really wanted to use her in a different way and to show that you don't have to be an expert at coloring to use these gorgeous stamps.


Can I just say how much I love these cool and lovely, yet earthy colors? 

Here are my steps:

1.The tag was created by first coloring on the tag using Gelatos® and blending with my finger. 

2. I tore off a piece of the polka dotted tissue paper and stamped what I had with the Jing Bloom Girl in white pigment ink and then heat setting with white embossing powder.

3. I then used Gel Medium to adhere the tissue paper to the tag. And heat set.

4. In random areas I used various shades of blue Stamper's Big Brush pens to color the flowers (I also used Gelatos® to color her face.)

5. I applied Whipped Spackle randomly through a stencil to various parts of the tag, Prior to the
Color Bloom Sprays were applied randomly.

6. The edges of the tag were inked using Archival Ink in Jet Black.

7. The snowflakes were something I just had in my stash and thought they'd look cute!

8. The finishing touches were to add the flowers. I love picking and choosing just the right ones, don't you?


I hope you liked this different take on a Winter tag and see how very easy it is to use the supplies you have on hand to make something very different and VERY beautiful.

Have a wonderful week!

Products Used:

Prima Bloom Girl Stamp (Jamie Dougherty Designs): Jing
Color Bloom Sprays:  Summer Sky, Vintage Metal – Precious Stone
Mica Flakes: Frosted
Prima - Finnabair Mechanicals - Vintage Trinkets - Leaves 1
Prima Stencil: 6 x 6” Lattice
Prima Flowers:
Cartographer – Adventurer
Bloom – Fresh Cut
Bloom  - Free Spirit 
London Collection – Majesty
Interlude A
Gelatos®
Stampers Big Brush Pens
Ranger Archival Ink - Jet Black
Ranger Tag
Hazel & Ruby Tissue Paper
Gel Medium
Gesso
White Pigment Ink
White Embossing Powder
Snowflakes (from stash)


Friday, December 5, 2014

Art Joural Page with GDT Ramona!

It's Ramona here and I am so excited to be Guest Designer this month for Jamie Dougherty Designs.  I decided to do my first post as a journal page.  I think that through journaling I can express myself and how I am feeling.  I love most of all to use all different kinds of mediums and anything that my heart desires.  Jamie has some awesome products with Prima to do this!!  Also Jamie has an online store where you can take some of her classes at Jamie Dougherty Designs     She is just amazing!!!


Products used: and these products are available at any of these places.   http://www.jamiedoughertydesigns.com/#!product-locations/c1gcn
 
Prima Marketing Wildflowers Pillar Pack White- Item #529567
Prima Marketing Say it in Crystal- Item # 560621
Prima Marketing Trim- Item # 573393
Prima Marketing Bloom Girls Jing Collection Stamp- Item # 980191
Prima Marketing Stencils Mask Set - 6 x 6 - Circular Lattice- Item #564216
Prima Marketing Stencils Mask Set - 6 x 6 - Flourish- Item #564278
Prima Marketing Flowers/ Frost Canson  2- Item #565800
Prima Marketing Bloom Girl Collection Paperclips- Item #573065
Prima Marketing Bloom Girl Collection Brads- Item #980108
Prima Marketing Shabby Chic Treasure’s Fly Away- Item #891480
Prima Marketing Chalks-Teal Damask, Vintage Pink, Rose Bud, Rock Moss and Rusty Keys
Ranger Archival Ink- Jet Black
Prisma Color Pencils
Gamsol
Faber-Castell Gel Stick
Fiber-Castell Pit artist Pen Big Brush Black
 
Thanks for looking and cannot wait to see what you use this stamp on.
Hugs

Monday, December 1, 2014

Christmas with Bloom Girl Gardenia

Today I am sharing a Christmas card I made with the Bloom Girl Gardenia stamp.
This is my first attempt at using some of the Mixed Media things I see everyone doing.
I know this is nowhere near what some of the Mixed Media Guru's do, but, hey, it's my first attempt.


The Bloom Girl stamps are just amazing if you like to use lots of layers and lots of different mediums.


I used my new FAVORITE papers from Prima's Cigar Box Secrets for my backgrounds.
I colored with Derwent's Inktense Watercolor pencils and used a collage decoupage to seal and glue everything together.


I added snowflakes, Prima Finnabair metal trinkets, Prima Flowers and little candies to complete the Christmas look.


I love the way this turned out and I hope you like it too.  I was nervous to try my hand at the mixed media techniques, but now, I think I might be hooked.

Thanks for stopping by today.  This has been Jeannie from The Polka Cabana with today's Bloom Girl Design Team post.