Showing posts with label Bloom Girl Sharon. Show all posts

Friday, December 12, 2014

Altered Mixed Media Bloom Girl Sharon Notebook


Hello crafty friends!
Mindy, here. I have an altered notebook to share with you. I will be completely honest. About 20 min into this project I was like ok, I'm done... this looks HORRIBLE! I almost turned off the camera. Then I was like you know what.. let's go with it.. I can always delete the video and start over.. I might as well try some new ideas and techniques. So I did and I'm so glad I did, too!
 
 
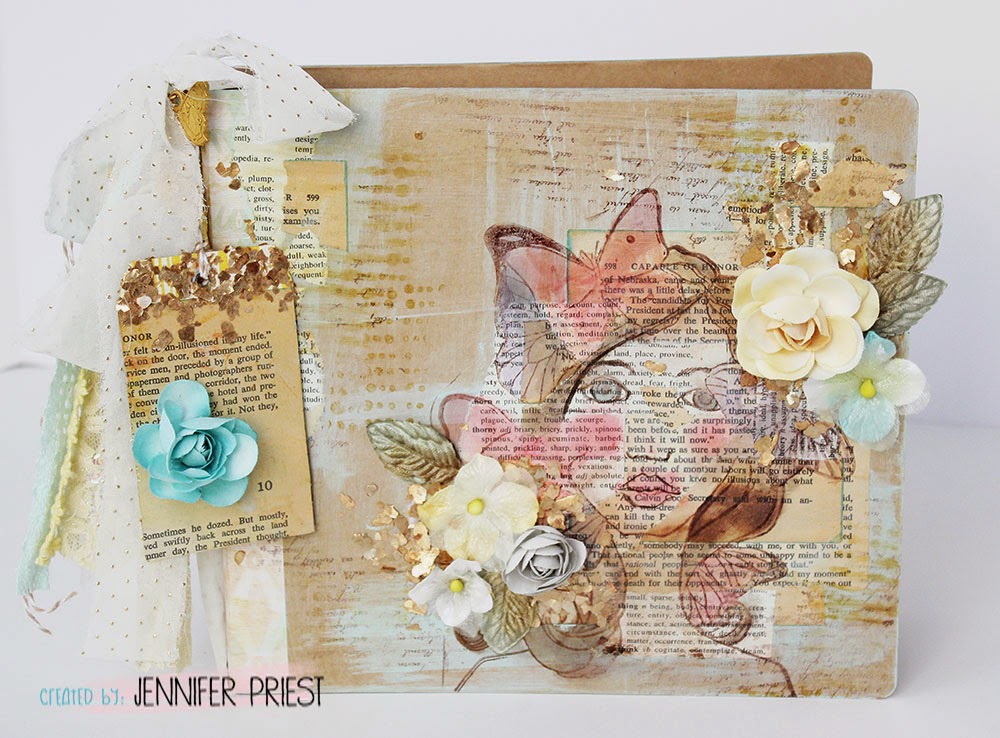
Here's my notebook I came up with.


I hope you enjoyed the photos.. I hope you will check out how I created this in my video below,


Products Used
Prima Marketing's Bloom Girl Sharon Stamp
Faber-Castell's Gesso, Water Color Pencils, Gelatos, whipped spackle and markers
Tim Holts Tissue Paper and Quote Stamp


Tuesday, November 18, 2014

A BloomGirl Altered Scrapbook Album

The gorgeous kraft paper cover of the Bloom Collection album is just begging to be altered! It's literally a blank canvas that you can customize for any theme or person. I decided to try some of the new Finnabair Art Basics on the cover while using the BloomGirl stamp "Sharon" as the main attraction:


I used the tag from the product packaging to create a hang tag on the binding of the book, to which I tied strips of lace ribbon, and torn fabric. I decoupaged book and dictionary pages to the binder cover, using Prima's new Chalkboard paint to add color. I then stamped the BloomGirl Sharon onto the book pages using ColorBox Crafter's ink, which I heat set to make permanent. Without heating, the ink would run when touched with your hands or with a marker or paintbrush when coloring the image in.


I used Tombow markers to color the stamped image in, using my fingers to blend the ink. I added some stamping with stamp wheels and then hot glued the flowers to the cver. I added dabs of Art Basics Gel Medium to the area around the flowers and sprinkled that with Art Ingredients Mica Flake.


Watch this handy dandy video I made that shows the process from start to finish:


Easy peasy right? Instead of attaching the tag to  the book, you could also use it as a holiday gift tag. Make a bunch of them from your old clothing and product packaging!


Supplies:
  • BloomGirl Sharon Stamp
  • Bloom Collection Album
  • Prima Gold Butterfly Charm
  • Prima Art Basics Gel Medium
  • Prima Art Ingredients Mica Flake
  • Prima Chalkboard Paint - Egg Blue
  • Prima Flowers
  • Assorted Ribbon and Fabric Strips
  • Rolling Stamps
  • Colorbox Archival Dye Ink
  • ColorBox Crafter's Ink
  • Heat Gun
  • Hot Glue Gun
  • Vintage Book and Dictionary Pages
  • Twine
  • Tombow Markers
  • Foam Paint Brush
Consider stamping faces onto book pages to make them easier to color (you won't have to worry about coloring the skin). You could totally do this on canvas too!

Visit my blog at hydrangeahippo.com


Thursday, November 6, 2014

Bloom Girl Sharon in Christmas mode by DT Stephanie!

Hi everyone! 


Stephanie here on the blog today, again with a card BUT this time, there's a Christmas twist hidden somewhere with one of the Bloom Girls!


I decided to use Sharon and instead of leaving her butterflies in the open, I covered them with gorgeous flowers, wooden and metal embellishments, plus LOTS of yummy twine from Prima Marketing. Don't you think she looks full of joy? As always with my stamps, she's coloured with Copic markers, then fussy cut on some parts that are longer than my regular 5.5"x5." card shape, all edges inked. I'm very pleased with the way she turned out, and you'll definitely see more Bloom Girls on Christmas cards this month!


Thanks for visiting us today, and don't forget to check in on our Facebook group to see sneaks and many other fun things about the Bloom girls. OH and did you see?! Our sweet Jamie is having a dt call! Be sure to share your creation using the Bloom Girls products on our creative group, you never know if you might end up with an invitation from Jamie herself to be on the team, woohoo!!

Wednesday, October 29, 2014

Just Breathe Tag with DT Lisa

Hi Bloomies! ;) It's Lisa with you today and I decided to spread my wings a little and do something I hardly ever, ever, EVERRRRR do: play with Copics. In fact, not too long ago I sold almost all of mine. I have about 25 or so left. So, this will be far from perfect, but I did have fun and I got a LOT of help from my Design Team mate Mindy (thanks sweets!).


I really wanted to NOT make a canvas or a card, so that's why I chose to make a tag. And tags are so fun to make. They can be so many sizes! This one is large at 4 1/8 x 8 1/2 and very 3-dimensional. It can be given as a gift on it's own or hung ON a gift. I just love tags. When was the last time YOU made a tag?

Here are some close-ups of my pretty Bloom Girl Sharon Tag:


I don't pretend to be an expert at Copics. I'm not. But, I sure had fun playing with them and I may break them out again. Who knows? And those of you who know how to use them and use them well? Have my FULL respect. They are not easy to master. Or even play with...ha! But I do hope you enjoyed my tag anyway.

Wishing you all a wonderful Wednesday. :)


Monday, October 27, 2014

Light Up Your Day Bloom Girl Style with Sherry Bienert

Hey everyone! It's my turn again to bring a little Bloom goodness to the blog!! I decided to challenge myself a bit for this project!!! So while I was at IKEA with my fiancĂ©, I took him over to the 'as is' section and said 'pick something.....' Five minutes later, with a smile on his face he hands me a tattered, stained, grey lampshade!!! I asked if there was a clean one, but with a grin he tells me no because this is the one he picked... And it's only 99 cents! I embraced the challenge and decided to showcase how easily anyone can transform an everyday object with things that are already in their stash!! Other then the lamp shade everything came from my stash already in the craft room!!


Let the transformation begin!!!! First I masked off randomly spaced, different width stripes vertically around the whole shade with painters tape, then painted between the lines with white acrylic paint. Before the paint dried I pulled the tape off then let dry completely. Using versamark and black embossing powder i embossed 'Summer' from the Bloom Girls cling stamps into place on the lamp shade.  Next I used Prima matte gel medium and collaged torn strips of old book paper, music sheet and drywall tape. Once the gel medium was dry I used a polka dots stencil And applied molding paste randomly around Summer and the paper strips! Let dry!


Taking an assorted selection of ink distressed Prima flowers and mechanicals, Bloom Girl brads, burlap and pearls I arranged them diagonally on either side of Summer. Using the Butterflies from the Sharon stencil and some black molding paste on a transparency sheet, I created beautiful 3d butterflies to add more dimension. I inserted my photo into a photo frame and selected a definition sticker and adhered with pop dots. To finish the shade off I added a few pops of color to Summer with acrylic paint and added a few splatters of white paint to tie everything together!!


And now I have a fabulous, customized lamp shade for my creative room!


Beautifulmess5891.wordpress.com

Sherry

Wednesday, October 22, 2014

Altered Bloom Book Box by Mindy!

 Hey crafty peeps!

It's Mindy here. I have an altered book box to share with you.
I have used my Bloom Girl Sharon Stamp. Which I just LOVE! I colored her in using my Copic. The flowers and papers are by Prima. This collection is so super cute, it's called Coffee Break.

Tomorrow I'll be heading out to Puerto Rico and this is actually one of the projects we are making this Saturday at Scrapbooking Gallery PR.


Don't forget we have our Challenge for this month. If you'd like to win this amazing goodie package from Jamie Dougherty play along and use your favorite Bloom Girl to enter!
 
Have a great week everyone!
 
Hugs, Mindy

Monday, September 22, 2014

"Playing Pretty" - A Scrapbook Page by Jennifer Priest

Have you ever played "dress up" as a little girl? My daughter recently had a fun playdate with my niece where they played "make up" instead of "dress up". I know the Bloom Girl "Sharon" would be perfect for helping to capture this moment on a scrapbook page. The beauty of BloomGirls is that you can literally "make them up" however you like. Blue eye shadow and a bright red lip? Coming right up! This page captures the essence of "playing pretty".


Here's how I created this page start to finish:


Supplies:

  • Bloom Girl "Sharon"
  • Bloom Collection Prima Flowers- Sunkissed
  • Bloom Collection Brads
  • Bloom Collection A4 Watercolor Paper
  • Faber-Castell Gelatos
  • Faber-Castell Watercolor Pencils
  • ColorBox Pigment Ink in Black
  • DecoArt Media Misters
  • Black Acrylic Paint
  • Black Shimmer Cardstock, 12x12
  • White Cardstock
  • Adhesive
  • Gunmetal Glitter Paper
  • Paper Trimmer
  • Paint Brush
  • Water
  • Paper Towels
  • Heat Gun

Next time you find a cache of "dress up"or "playing make up" photos, consider using a Bloom Girl to help showcase the memory. Thank you for visiting today. For more from Jennifer Priest, check out http://hydrangeahippo.com


Tuesday, September 16, 2014

Canvas Bag Tutorial with DT Stephanie

Hey everyone! DT Stephanie here!

 So how do you like to play with the canvas tote bag so far? Did you enter the contest yet?
If not, here's a fancy and simple way to make one, based on the bag you've seen on Prima's blog.


Supplies used : Canvas bag, Bloom Girl Sharon stencil, Elementals Rattan stencil, black paint, Color Bloom ink of your choice, sponge, light brush, water, E-6000 glue, ribbons, Elementals metal embellishments and flowers from Prima.

First, put a cardboard or something flat and strong inside the bag so you alter only one side of it.


Decide which stencil you'd like to use. I wanted to give an angelic look to this tote, so I went with the Sharon one.


With your sponge, gently dab some black paint on the stencil. Make sure the silhouette doesn't move!


Do the same thing by placing your next stencil on each side of your Bloom Girl.


With a light brush and some water, try applying Color Bloom ink along the edges of the silhouette, as if it was a graphic look. If your lines seem too bold, add more water and gently stretch the ink towards the center.


Add some ribbons from your stash on the handle for a little bohemian look.


Glue flowers and metal embellishments here and there, forming clusters.


VoilĂ ! So now make sure you enter the contest to win awesome PRIZES!

Monday, August 25, 2014

Bloom Girl Inspiration with GDT Courteney!

Today we have GDT Courteney here to share this gorgeous project with us.
 Nothing like a great summers day to sit and play!!
 Everything about summer is beautiful here in Alberta!
Butterflies & Flowers being two of my favourite things so I just had to use the stunning

Luckily the shop that I work at had these amazing wooden butterflies. I seriously had been looking at them for weeks trying to figure out what I could make with them.
A coat of Gesso and some of Prima's beautiful Bloom Sprays. Lots of fun spraying and a whole bunch of drying!  I got the design I was looking for! Stand out amazing color with a beautiful shine!
Coloring is definitely my favourite part of all my Bloom Girl creations and this project was no exception. This time I chose my water color pencils. With so many butterfly's you can use so many colors!!!
Adding some of Prima's "Say it in crystals" and Flower vines was just the icing on the cake.
 So much fun!
Once everything was dry I layered the wooden butterflies on top of each other. Once layered I decided you couldn't have a butterfly without intenia so I curled some of Prima's wire around a paint brush and slowly pulled the wire off. Ending up with the perfect pair of intenias.
I hope you all enjoy!!!!


Have a great day!


Friday, August 8, 2014

Art Journal Layout with DT Wendy.

It's Friday already and you all are in for a treat!
Design Team Member Wendy has a gorgeous art journal page to share.
 Get ready to pick yup your jaw from the floor.. I know I did!
Wendy has used the stamp, Bloom Girl 'Sharon'.
I just adore this image and what she has done with it.
 
 
Here's some product information Wendy would like to share.
 
You can alter up your Project Life albums by adding in touches of mixed media.  I used the 6x8 Project Life album.  You can easily slip in the pages into a page protector inside your album.


The Bloom - Cling Stamp - Sharon stamp works great as the base for your drawing.  I used shading techniques to add life and details to the stamped image. Try stamping and drawing on vintage book text paper.  I love adding this special touch of wording/book text to my portrait drawings.


 I connected the two 6x8 pages together with the butterfly theme and worked the trailing butterflies across both pages for the flow of the theme and mood of the pages.
 
Sometimes you don’t need to add photos to your Project Life albums and lend yourself to play and explore with paint and drawings to document your life.
 
Thanks for joining us today.
 Hopefully your weekend is full of inspiration and creativeness!
 
♥ DT Coordinator Mindy Baxter