Showing posts with label Bloom Girl Hope. Show all posts

Wednesday, December 17, 2014

Fancy Christmas Tags by DT Stephanie

Good morning Bloomies!

Stephanie here on the blog today with another Christmas inspiration for you, gift tags! You might remember my video on how to make a Bloom Girl tag earlier in November (warning - french speaking eheh!), where I was already starting the background of two more tags. Well, here they are today!

The first one was made with a watercolour paper tag absorbing all the ink from the Color Bloom sprays that was left on my teflon mat, then dried with a heat tool. I added some light paste through a stencil, letting it dry on its own this time to make sure it stays in shape. After that, I added a beautiful piece of Prima trimming in the middle, half-stamped Bloom Girl Free Spirit and coloured her with Copic markers. She was then put on 3D foam adhesive, got bloomed up with some gorgeous flowers and THAT'S IT! Quick and easy, right?!


The next tag was done with Bloom Girl Hope and approximately the same steps as the Free Spirit one, only this time when the light paste was fully dried, I added pinch of colour accents on it by dipping my brush into the Color Bloom spray bottles.


Thanks for visiting us today, and don't forget to check in on our Facebook group to see sneaks and many other fun things about the Bloom girls!

Friday, November 28, 2014

Christmas With Bloom Girl Hope

Today, I am showing off this gorgeous card I made with the Bloom Girl Hope stamp


Since it's Christmas Time, soon, I decided to put a Christmas spin on the card.


I made a little Santa Claus hat for her and made her dress look festive too.


Can you see the Christmas candies tucked here and there?


Using the Prima Mini Type letters and the Prima Cigar Box Secrets papers, I was able to finish this off.


I adore the way this all came out and will make another fun Christmas project to share for my next post.  
I hope everyone had a wonderful Thanksgiving.

This has been Jeannie from The Polka Cabana with today's Bloom Girl Design Team post. 

Friday, November 14, 2014

Pocket Page Inserts by DT Louise :) :) :)

Hello Hello Fellow Bloom Girl Fans :)

Today I would like to share with you some pocket page inserts that I made using the wonderful Bloom Collection Cling Stamps from the Insta Chic range :)

I have created the 3 main sizes of 6 x 4, 4 x 4, and 3 x 4 inch.

If you click on the images they are linked to product pages for Prima Marketing :) :) :)


so love these Instachic range of Bloom Girl Stamps, they are just the perfect size for the 6 x 4 inserts. I have white heat embossed these using a fine embossing powder, on a painted background.


The Bloom Collection metal flowers are just the perfect touch!!! :)


For these 4 x 4 inserts I have done some fun resist embossing with water colour paints. 


These are the new release Bloom Collection Metal Flowers that I have used to embellish the inserts I so so luuuurve them :) :) :)


Other products that I have used are;
  • Cardstock
  • Distress paint
  • Water colour paint
  • Felt tip pen 005
  • Adhesive rhinestones
  • Embossing ink and powder
Well that is it for me for the moment, I will be back later in the month with more of my creative fun with the Awesome Bloom Collection! :) :) :)

Tuesday, November 11, 2014

Welcome our Guest Designer Zoey!!!!

Hello beautiful people!
Zoey's here to bring you my very first post! We will make a Tag today, something that lately is something that I really enjoy doing!
I started off by coloring my background using Gelatos by Faber-Castell Design Memory Craft , I blended the color using my fingers and then I added some stamps using Prima Clear Stamps.


I kept adding texture to the background and then I finally stamped this amazing Bloom Girl : Hope.
I love that stamp. I love to imagine stories behind her eyes, I love to imagine what she is thinking right now and what she is looking at. I love daydreaming while I create, you will learn to know me! LOL. Anyway, after I stamped her with Archival Ink, I started adding colors.
I know nothing about coloring, but, I try to add a bit of color anyway to my creations!


 Here's a photo after few coloring steps. Yes I know, not perfect but...hey! Perfection is boring, right?! ehehe
As you might notice, I did not color the flower in her head -- you will know why in the next step!


I stamped again -- this time only the flower , and added more color. I used distress markers to color both Hope and the flowers. After coloring the flowers, I cut them in few pieces.
I will later add the flowers to create some dimension.


Since the background was not enough filled, I decided to use this Prima stencil (Orbs) and with the Faber-Castell Pitt Artist Pen in white, I colored the circles.


The only thing I did after the ink dried, I added few details, colored her eyes and lips and added stickers to create my sentiment.


I hope you will like the result, as always for any comments, questions, suggestions please leave a comment!
Stay happy , Stay creative... till next time!
CIAO Zoey

Monday, October 6, 2014

Bloom Girl Hope card by DT Stephanie!

Hi everyone! 

Stephanie here on the blog today for a card with Bloom Girl Hope. She inspires me vision, and the concept of being open-minded to all that happens to you.

I stamped her twice, first on Xpress blend sheet and then on a patterned sheet from the gorgeous Cartographer line at Prima. The blank silhouette on Xpress paper got coloured with Copics markers (E000-00-21-11-04, R20, BV20-23-25-29, V91-95-99). I decided to cut the hair out of the Cartographer girl, leaving an opening for the flowers, and I traced the edges with black marker, then glued it on the first silhouette.

I also used other papers from the Cartographer collectionCartographer flowers, Cartographer flair, Ingvild Bolme resin frame from Prima Marketing, Tim Holtz long fasteners metal brads, Distrezz-it-all tool from Zutter.


Thanks for visiting us today, and don't forget to check in on our Facebook group to see sneaks and many other fun things about the Bloom girls <3


Wednesday, September 24, 2014

Mixed Media with DT Janine using Bloom Girl Hope!

It's Janine Koczwara here again with today's post.  I always love to try new things and in that spirit I was intrigued to see how stamping onto printed tissue paper and then coloring the stamped Bloom Girl image would turn out.  I love the multi-layered effect I can achieve with tissue and wanted to combine it with my love of Bloom Girl stamps.

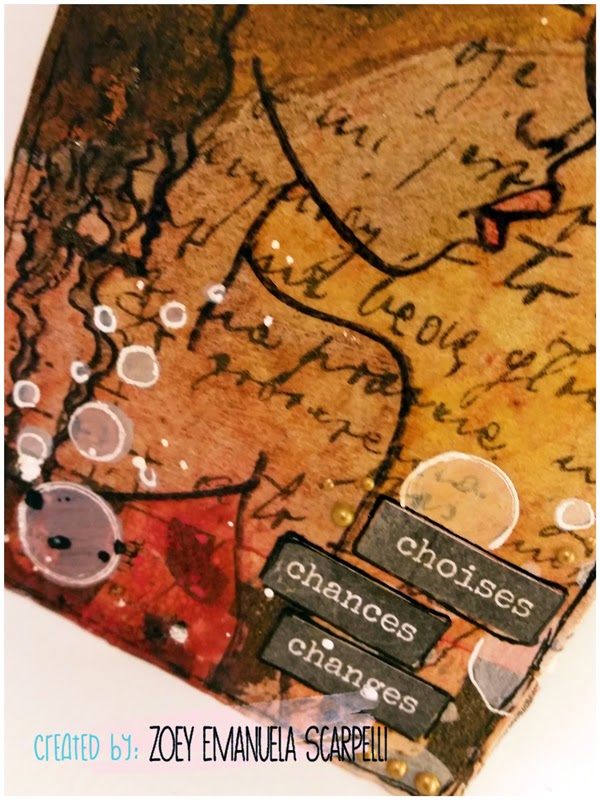
So the first step was to stamp "Hope" onto Tim Holtz tissue paper and then cut around the image.  I took a Ranger Kraft size 8 tag and swiped a touch of gesso onto the background before adding a slight touch of bloom spray.  Dried it off and then used Matte Medium to apply my stamped Bloom Girl tissue paper onto the tag before applying Faber Castell Gelatos and Big Brush Markers to color the image.  It was fun and created a different, more sheer look to the image.  You can still see the Tangerine Bloom Spray coming through the tissue from underneath.


Then it was onto creating a fun Mixed Media back ground for my stamped image.  I once again used the Bloom Watercolor Paper (yes I am in love with this stuff and have used several pads of paper already!)
I started by adding color onto the background with Color Bloom Sprays and a mop brush, watering it down at times for different intensities of the color.  After drying this off I masked with Prima Heavy Gesso through the Prima Random Circles mask and dried off again before adding more Bloom Spray for patches of greater intensity.

I then used the Prima Bloom Stamp that comes with the Flairs, to stamp different colored flowers with Prima Chalk Inks (Fall Leaf and Coldsfoot Petals), fussy cut around these and added embellished the page with these and Prima Bloom Flowers that have been altered using Bloom Sprays.


I had a lot of fun altering and experimenting on this page.  I would recommend having a play with stamping onto tissue, then using soft gel medium or matte medium to apply to your paper before coloring as  the sheer layers give so many opportunities for creativity.  If you do try this technique please share it on the Bloom Girls Creative Group on Facebook!

PRODUCTS USED:
980047 Prima Bloom Stamp Hope
9800269 Prima Bloom Watercolor Paper Pad
 980085 Prima Bloom Flairs
573065 Prima Bloom Clips
575182 Prima Bloom Flowers
846817 Prima Forever Green Garden Talk
846763 Prima Forever Green Watch Them Grow
960179 Prima 6x6 Checker Stencil
960445 Prima Bubbles Stencil
891299 Prima Chalk Coldsfood Petals
891282 Prima Chalk Fall Leaf
573935 Prima Bloom Spray Tangerine
573874 Prima Bloom Spray Sorbet
 961442 Prima Heavy Gesso
961428 Prima Soft Matte Gel
Ranger Tags Size 8 Kraft
Tim Holtz Tissue Paper
Tim Holtz Distress Ink Mustard Seed
Tim Holtz Distress Ink Ripe Persimon
Faber Castell Gelatos
Faber Castell Big Brush Markers
Stampendous Mish Mash Stamps
Luminarte Silks Solar Gold
Luminarte Polished Pigments Gold Dust
Sharpie White Paint Pen
Sharpie Black Pen


Friday, August 15, 2014

Hope Canvas by DT Lisa

Hi, it’s Lisa here with you and I’m sharing with you a small 6” x 6” canvas on hardboard. I’ve used Jamie’s beautiful Bloom Girl Hope stamp as my focal image.


This canvas was very easy to create. I used Gelatos® in Iced Chai, Iced Coffee, and Gold Champagne to create the majority of my background and just blended it with my fingers. The area that I wanted left open for the image I wiped away with a baby wipe. Hope was stamped in Archival ink in Coffee and colored with Faber-Castell watercolor pencils.

Once she was all colored in to my liking I added a light coating of Gel Medium with a dry brush to seal everything. Then I added all of those gorgeous flowers. I used the Bloom flowers in Fresh Cut, Sun Kissed, Freshly Picked, and Radiant Petals. Also used: Talia - Tempting, Cartographer – Adventurer.


To complete my canvas I added microfine glitter to the edge of the canvas. It seemed to be just the right finishing touch. Hope you all have an amazing and creative weekend!

PS - Don't forget to check out the August challenge! It's awesome and you have ALL month to play along. Woohoo!

♥ Lisa Adametz