Tuesday, January 6, 2015

Bloom Girl Gardenia with Easy Background Tutorial

Hi my sweet Bloom friends. It's Lisa here with you today and I have a little tutorial today on how to create a fun background for any card, but ESPECIALLY your Bloom Girls (and upcoming Guys, too.) Here's the card I created using the technique:


1. Start off with watercolor paper. Jamie has awesome watercolor paper!! Did you know? She does! It's a beautiful, thick paper that is A4 sized. Just trim a sheet to 4 ¼ x 5 ½" and place Frog tape or other low-tack painter's tape around the edges.

2.  Using an acrylic block (mine was 1 x 7" long) rub a Gelato® completely all over one side. Spritz with water and then press (rather hard) onto the paper. Before removing the block, lift the block in different areas. This will give you a more watercolored look - more random.


3. Repeat the process for each color you wish to use. It's completely fine to overlap the colors and to let them drip into each other. (For this card 4 Gelatos® worked perfectly.)

4.  Prior to doing any stamping with your Bloom Girl it is important to allow the background to either air dry or heat set. **Do not get too close with your heat tool if you use a high temp embossing gun.**

5. I do stenciling and spraying PRIOR to stamping, which may seem weird. But I do this so I don't get too hung up on placement, It just feels more organic to me that way. I hope that makes sense. The times that I don't do it this way is when I'm using a texture paste or things that require layers.

6. Stamp Bloom Girl Gardenia using an Archival Ink. (I used Coffee by Ranger.)


(You can see the stencil over her facial area.)


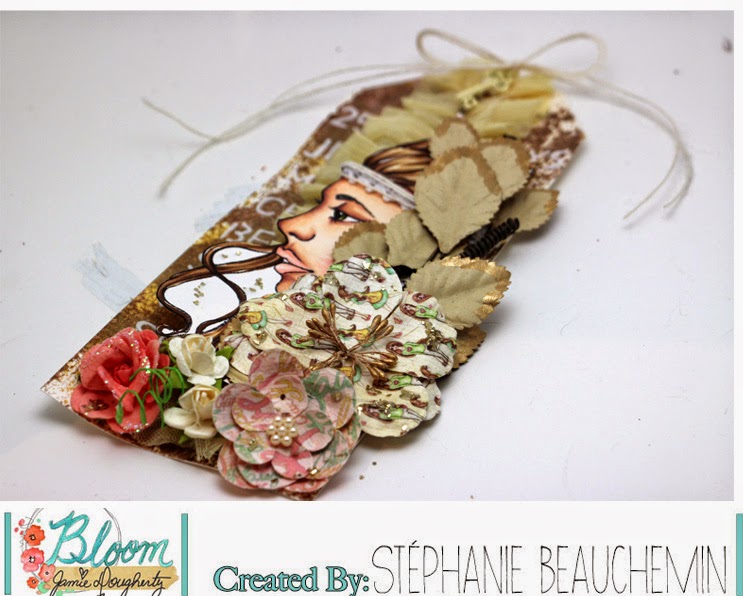
7. Once the Bloom Girl is stamped the rest is really up to you and how you want to embellish and finish it up -- what you want to add to make it YOUR OWN. :) You can see my close ups to see what I added (and the product list, too.)


Another angle:


If you're more of a visual learner (some of us are - myself included!), here is a video I created with this same technique for Faber-Castell Design Memory Craft®.


I hope that you enjoyed this fun technique and will use it on one (if not MANY) of your next Bloom Girls!

Thanks for stopping by today!


Products Used:
Prima:
Prima Bloom Girl Stamp (Jamie Dougherty Designs):  Gardenia – 980207
Jamie Dougherty A4 Watercolor Paper - 980269
Color Bloom Sprays:  Summer Sky, Vintage Metal – Gold Foil - 573805
Mica Flakes: Frosted, Gold Leaf – 961756
Glass Glitter, Gold Rush - 961657
Prima Stencil:  Checker - 960179
Prima Flowers:
*Prima Sugar Bloom Collection - 549053
*Talia Tempting - 574680
*Cartographer Adventurer – 574529
Bloom Typewriter Keys - 573065


Other:
Ranger Archival Ink – Coffee
Faber-Castell Design Memory Craft®:  PITT Artist Pen (Dark Sepia – 125), Gel Medium, Gelatos® (Iced Coffee, Cinnamon, Iced Chai, Gold Champagne), Albrecht Durer Watercolor Pencils (Medium Flesh – 151, Cobalt Green – 156, Raw Umber – 180, Burnt Siena – 283).
My Favorite Things – Hot Fudge Cardstock


Wednesday, December 31, 2014

Beautiful Canvas and Quote by GDT Ramona!

 
I would like to thank Jamie for the opportunity to work with her awesome Bloom Girls!  This was such a fun canvas to do.  When Jamie sent me the Guest Design Team package… I knew that I wanted to use this Bloom Girl called Free Spirit and touch it with a bit of my Shawnee heritage.  So I decided to use a quote from my 4th Great Grandfather Tecumseh in grey vinyl.  On this canvas I traced the face on a separate piece of paper and cut it out then aliened the stencil up to the face and used Molding Paste and Gesso.  Worked out really good….then I used watercolors on her face and then I used watercolors and Pan Pastels on her hair.  If you look close to the face you can see that it looks like and Indian map from Finnabair’s paper collection.  I let it set over night and then decorated it with Prima Flowers and embellishments.  Hope you like my creation as much as I loved making this!!    


Below you will find a list of items used in making this. 

Bloom Girls 12X12 Stencil- Free Spirit Item #655350

Prima Marketing –Time Traveler’s Memories Paper Item #813956

Finnabair’s Prima Marketing Paper Item #960728

Prima Marketing Lace-Item # 921422

Prima Marketing Symphony Blend Amoroso Pink Flowers Item #537852

Prima Marketing Say it in Crystals Item # 560621

Prima Marketing Chalk Vintage Pink and Old Rose

Be sure you check out Jamie’s upcoming classes.  http://www.jamiedoughertydesigns.com/

Hugs~

Ramona


Friday, December 26, 2014

Mixed Media altered frame with Gardenia by DT Stephanie

Good morning Bloomies!

Stephanie here on the blog today with a Christmas prezzie that went to one awesome gal! I try to go out of my comfort zone as often as possible, but sometimes it can go all wrong, like this AHAHAH...oh well, I'm still showing it to you guys!


So the idea was to turn a blank wooden frame (from Michael's) into a total mixed media madness gift. Knowing me, you all realize I couldn't pass the opportunity to put a Bloom Girl coloured in Copics on that, don't you?! Miss Gardenia here got stamped and coloured, then fussy cut to keep only a small section of her bust and hair. 

I inked the frame with a white Prima Chalk Edger (loooooove those cutie inks, so affordable and practical!), added some mold paste with a checkboard stencil, glued some lace and trimmings on half of it, and added several pieces of embellishments, all from my Prima stash box. Everything got a nice coat of heavy gesso from the Finnabair line and got dried with my heat tool. After that, I sprinkled a few pigment powders from Luminarte here and there, misted water over the whole thing and let dry on its own. As always, I put my Bloom Girl on foamy adhesive and VOILĂ€!


Close-ups...


What about you, did you make some crafty gifts for Christmas? Come and show us on the Bloom Girls Creative Group on Facebook!

Wednesday, December 24, 2014

Bloom Girl "Offuser" with GDT Hee Sun Kim.

Hee Sun Kim here with my GDT project for Jamie Dougherty Designs.
Do you know "Offuser"? 
It is [Ornaments + diffuser] 
Today.  I would like to share "Bloom Girl Offuser" tutorial with you.  
 
1. Press the stamp on the paper clay.
 
2. Cut along the lines of the clay.
* Tip *
Feathers, hair etc...Add paper clay for a 3D effect. (relievo effect)


3. Make a mold. (using Ranger - Mold-N-POUR)


4. Let's make a offuser.
warm water 80ml + Emulsifiers 12g + Gypsum powder 200g + Aromatic oils 6g (I've added strawberry flavor.)
In a bowl, blend all swirl ingredients. 


5. Please poured into a mold. Please harden for about 30 minutes.


6. Painted using chalk board paint.


7. Please gold paint on protruding parts. I've used 'gold powder + glaze'.


8. Finish!


9. Let's wrap the box! Stamping on handmade paper.
 
 
10. Finish!
Merry Christmas and a Happy New Year! :)


* Materials
#980191 Prima - Bloom Collection - Cling Mounted Stamps - Jing Bloom
#980184 Prima - Bloom Collection - Cling Mounted Stamps - Free Spirit Bloom
#980016 Prima - Bloom Collection - Bloom Girl - Cling Mounted Stamp - One
#980054 Prima - Bloom Collection - Bloom Girl - Cling Mounted Stamp - Five
#575182 Prima - Bloom Collection Sunkissed Flowers
#930042 Prima - Vintage Metal Trinkets
#564506 Prima - Flower vine
#556969 Prima - TASHA Fabric Flowers - FROST
#577186 Prima - Chalkboard Paint - Black - 8.5 Ounces
#573065 Prima - Bloom Collection - Paper Clips - Typewriter Keys 
Prima - Ingvild Bolme - Chalk Fluid Edger - Vintage Pink, Tin Can, Teal Damask 
Ranger Ink  MOLD-N-POUR
Ranger Ink - Vintaj - Glaze - Metal Sealer and Patina Extender - 2 Ounces 
Ranger Ink - Perfect Pearls - Pigment Powder - Perfect Gold 
 

Tuesday, December 23, 2014

New Bloom Girls and...Guy!!! They are coming to a Store Near you!!

It's that time of year again. Winter CHA. That means new designs, new product, and new goodies to create with. This year I have new stamps and stencils coming your way with Prima Marketing! They are some of my favorite yet! Here are a few samples using the new designs. The Bloom Collection is so versatile and can be used in so many different applications.

Quentin is going to be our first ever guy! He's got that steampunk edge and is perfect for cards, tags, and as you can see even Mixed Media! <3 data-blogger-escaped-nbsp="" data-blogger-escaped-p="">
Home decor, and fiber art is a perfect place to use your Bloom girls stamps. Embroidery is becoming a popular pastime, why not create your own Bloom girl work of stitched art. 

The Bloom Collection is perfect for those art journals and art pieces. You can't draw? Not a problem, use bits and pieces of the stamp to help you design a finished art piece. 


Check out the word "CREATE" A new addition to the bloom collection... Thread letters! They are lightweight and three-dimensional, the perfect finishing touch to any DIY project. They come white so you can customize them to match any project!

This release is my most favorite yet! 

I hope you enjoy and can't wait to see what you all create with the new collection. 

Jamie

Friday, December 19, 2014

New Bloom Stamp Art Journal Page with Janine Koczwara

Hi everyone it's Janine Koczwara here and to say I was a little excited to receive some new Prima Bloom Girl stamps is an understatement!  It is amazing what new product can do for a girls creativity!  I set about stamping and colouring a couple of these beauties straight away!  My default method of colouring is Alcohol Markers and coloured pencils.  I like the feel of it and I find it the easiest way for me to colour images and get deeper shading results that I am pleased with.


With such a gorgeous stamp I felt the call of the mermaid art journal page!  I went straight for Teals and Blues to create this background for my pretty little Mermaid.  I started with an acrylic paint base and layered in some masking with one of the New Bloom Stencils and then some subtle stamping for additional background texture.

I wanted her to be hiding behind a rock with a tail sweeping from behind, most of it not visible.  I am a novice to drawing, so I pulled up a reference image of a rock and sketched it onto Prima Bloom Watercolour Paper, adding deeper shadows with Caran deAche Neocolours II, before applying it with matte gel to the page.  I created the tail in exactly the same way, but added Glass Bead Gel to it for a rougher shimmery surface.


Finally, I really am trying to explore using my own hand writing on my journal pages.  Learning to draw and create my own lettering is one of my goals to stretch myself creatively.  I practiced a couple of different styles on copy paper to see what style I wanted before ruling lines on my art journal page and penciling in my letting.  Once satisfied, I went over it all with Pitt Artist Pen in Black and a final touch of glitter to give it something a bit extra.


I love using Jamie's new Bloom Stamps for my art journaling.  I can work on my shading skills while also challenging myself to try drawing other elements, and practice lettering to compliment the pages, knowing it is just in my journal, a place that is safe to practice and try.  If I like it I can photograph it and share.  I really do recommend starting an art journal and having a wonderful play in it's pages.

You are all going to LOVE the new release Bloom Girl products Jamie has designed!  There are so many awesome stencils and stamps for you that will totally inspire creativity!

Products Used:
980344  Prima Bloom Stamp Sirena
980399  Prima Bloom Stencil Spark
980269  Prima Bloom Watercolor Paper Pad
961992  Prima Cling Stamp Dream On
961978  Prima Cling Stamp Net and Wire
Prima Random Circles Stencil
Alcohol Markers
Prismacolor Pencils
Derwent Inktense Pencils
Caran deAche Neocolors II
Prima Heavy Gesso
Prima Soft Matte Gel
Luminarte Polished Pigment Powders
Liquitex Glass  Bead Gel
Sharpie Black Pen
Sharpie White Paint Pen
Faber Castell Big Brush Markers
Faber Castell Pitt Pens
Ranger Stickles
Ranger Archival Ink Black
Memento Black Ink


Wednesday, December 17, 2014

Fancy Christmas Tags by DT Stephanie

Good morning Bloomies!

Stephanie here on the blog today with another Christmas inspiration for you, gift tags! You might remember my video on how to make a Bloom Girl tag earlier in November (warning - french speaking eheh!), where I was already starting the background of two more tags. Well, here they are today!

The first one was made with a watercolour paper tag absorbing all the ink from the Color Bloom sprays that was left on my teflon mat, then dried with a heat tool. I added some light paste through a stencil, letting it dry on its own this time to make sure it stays in shape. After that, I added a beautiful piece of Prima trimming in the middle, half-stamped Bloom Girl Free Spirit and coloured her with Copic markers. She was then put on 3D foam adhesive, got bloomed up with some gorgeous flowers and THAT'S IT! Quick and easy, right?!


The next tag was done with Bloom Girl Hope and approximately the same steps as the Free Spirit one, only this time when the light paste was fully dried, I added pinch of colour accents on it by dipping my brush into the Color Bloom spray bottles.


Thanks for visiting us today, and don't forget to check in on our Facebook group to see sneaks and many other fun things about the Bloom girls!